
Birdeye AI
🚧 Welcome to the Birdeye MCP ServerBirdeye MCP Server is currently in Beta. We're constantly improving, and your feedback is crucial. Please share any thoughts or suggestions.
📕 Overview
The official Birdeye MCP Server is now live, making Birdeye data readily available to your AI models and applications. With the Birdeye MCP, you can empower your agents to:
- Access real-time market data: Get aggregated prices, market cap, and trading volume for over 15k+ coins on Birdeye.
- Dive into onchain analytics: Query onchain DEX price and liquidity data for more than 8M tokens across 10+ networks.
- Discover market trends: Instantly find trending coins, new token listings, top gainers/losers, and popular NFT collections.
- Retrieve rich metadata: Pull essential details like project descriptions, logos, social links, contract addresses, security info, and more.
- Analyze historical performance: Access historical price, market data, and OHLCV for any cryptocurrency.
- Explore crypto categories: Effortlessly list coins within specific sectors like Meme, DeFi, Layer 1, AI agent, and more.
MCP Demo with Claude Desktop
🔥 Getting Started
Connecting your AI to Birdeye is simple. We offer several MCP server options to fit your needs, from keyless access for testing to authenticated connections for production applications.
Most MCP-compatible clients, like Claude Desktop, Gemini CLI, and Cursor, can be configured using a simple JSON file (e.g., claude_desktop_config.json)
📘 Prerequisites
- Make sure your device has
nodeinstalled. You can download it from nodejs.org/download- If you are using Claude Desktop, node version 18 or higher is required.
- Get your API key (see "How to get Birdeye API Key" below)
How to get Birdeye API Key
- Login to bds.birdeye.so
- Go to Usages -> Security
- Click Generate Authentication key -> Copy
api key
Watch the video below for a quick guide on how to set up the Birdeye MCP Server with Claude as an example.
Pick Your Endpoint
Wrong choice wastes a call. Match the task:
| You need | Hit this | Ref |
|---|---|---|
| Supported networks | GET /defi/networks | reference/get-defi-networks |
| Current token price | GET /defi/price | reference/get-defi-price |
| Historical price (line) | GET /defi/history_price | reference/get-defi-historical_price_unix |
| OHLCV candles (token) | GET /defi/v3/ohlcv | reference/get-defi-v3-ohlcv |
| Token stats / overview | GET /defi/token_overview | reference/get-defi-token_overview |
| Token trades (V3) | GET /defi/v3/token/txs | reference/get-defi-v3-token-txs |
| Trending tokens | GET /defi/token_trending | reference/get-defi-token_trending |
| Meme token list | GET /defi/v3/token/meme/list | reference/get-defi-v3-token-meme-list |
| Smart money token list | GET /smart-money/v1/token/list | reference/get-smart-money-v1-token-list |
| Token security / risk | GET /defi/token_security | reference/get-defi-token_security |
| Holder distribution | GET /holder/v1/distribution | reference/get-holder-v1-distribution |
| Token transfer list | POST /token/v1/transfer | reference/post-token-v1-transfer |
| Wallet current net worth | GET /wallet/v2/current-net-worth | reference/get-wallet-v2-current-net-worth |
| Wallet net worth chart | GET /wallet/v2/net-worth | reference/get-wallet-v2-net-worth |
| Wallet PnL summary | GET /wallet/v2/pnl/summary | reference/get-wallet-v2-pnl-summary |
| Wallet tx history (beta) | GET /v1/wallet/tx_list | reference/get-v1-wallet-tx_list |
| Search (token/market) | GET /defi/v3/search | reference/get-defi-v3-search |
Which MCP Server Should You Use
Here's a breakdown of the available options to help you choose the right one:
| MCP Server Type | Best For | Setup Details |
|---|---|---|
| Remote Server (Authenticated) |
| https://mcp.birdeye.so/mcp |
Remote Server (Public, Keyless)
The easiest way to get started. Just add the following to your client's mcp_config.json file.
📘 Client-Specific ConfigThe file name and location depend on your client. Find your config file here: modelcontextprotocol.io/quickstart
Add the following configuration to your birdeye_mcp_config.json:
{
    "mcpServers": {
        "birdeye-api-mcp": {
            "command": "npx",
            "args": [
               "-y",
                "[email protected]",
                "https://mcp.birdeye.so/mcp",
                "--header",
                "x-api-key:${API_KEY}"
            ],
            "env": {
                "API_KEY": <YOUR_API_KEY>
            }
        }
    }
}
Here's a quick 2-minute tutorial for setting up the public server with Claude Desktop:
How to Connect Birdeye MCP to Claude Desktop: Step-by-Step Guide - YouTube
How to Connect Birdeye MCP to Claude Desktop: Step-by-Step Guide
Remote Server (Authenticated)
Step 1: Add the configuration
Add the following configuration to your mcp_config.json:
JSON
{
    "mcpServers": {
        "birdeye-api-mcp": {
            "command": "npx",
            "args": [
                "-y",
                "[email protected]",
                "https://mcp.birdeye.so/mcp",
                "--header",
                "x-api-key:${API_KEY}"
            ],
            "env": {
                "API_KEY": <YOUR_API_KEY>
            }
        }
    }
}
Step 2: Authorize your MCP access
- Simply paste in your Birdeye API key, and authorize to link your key to the MCP session.
✨ Don't have an API key yet? Upgrade to Pro today! Read more here.
- You can also toggle between dynamic/static tools here. Learn more about
🚀 Connecting with Claude
Connecting Birdeye MCP to Claude is straightforward. The method varies slightly depending on your Claude plan.
For Claude Free Users (via Claude Desktop)
You must use the Claude Desktop app and modify the configuration file.
- Locate
claude_desktop_config.json: Follow the instructions here to find the file on your system. - Add a server config: Copy and paste one of the server configs above that matches your use case.
- Restart Claude Desktop: Close and reopen the app for the changes to take effect.
For Claude Pro Users
👍 TipsYou can also follow the same steps as the Free users by modifying the
claude_desktop_config.jsonfile.
-
In Claude ( claude.ai or the Desktop app), click on 'Add connectors' in your chat.
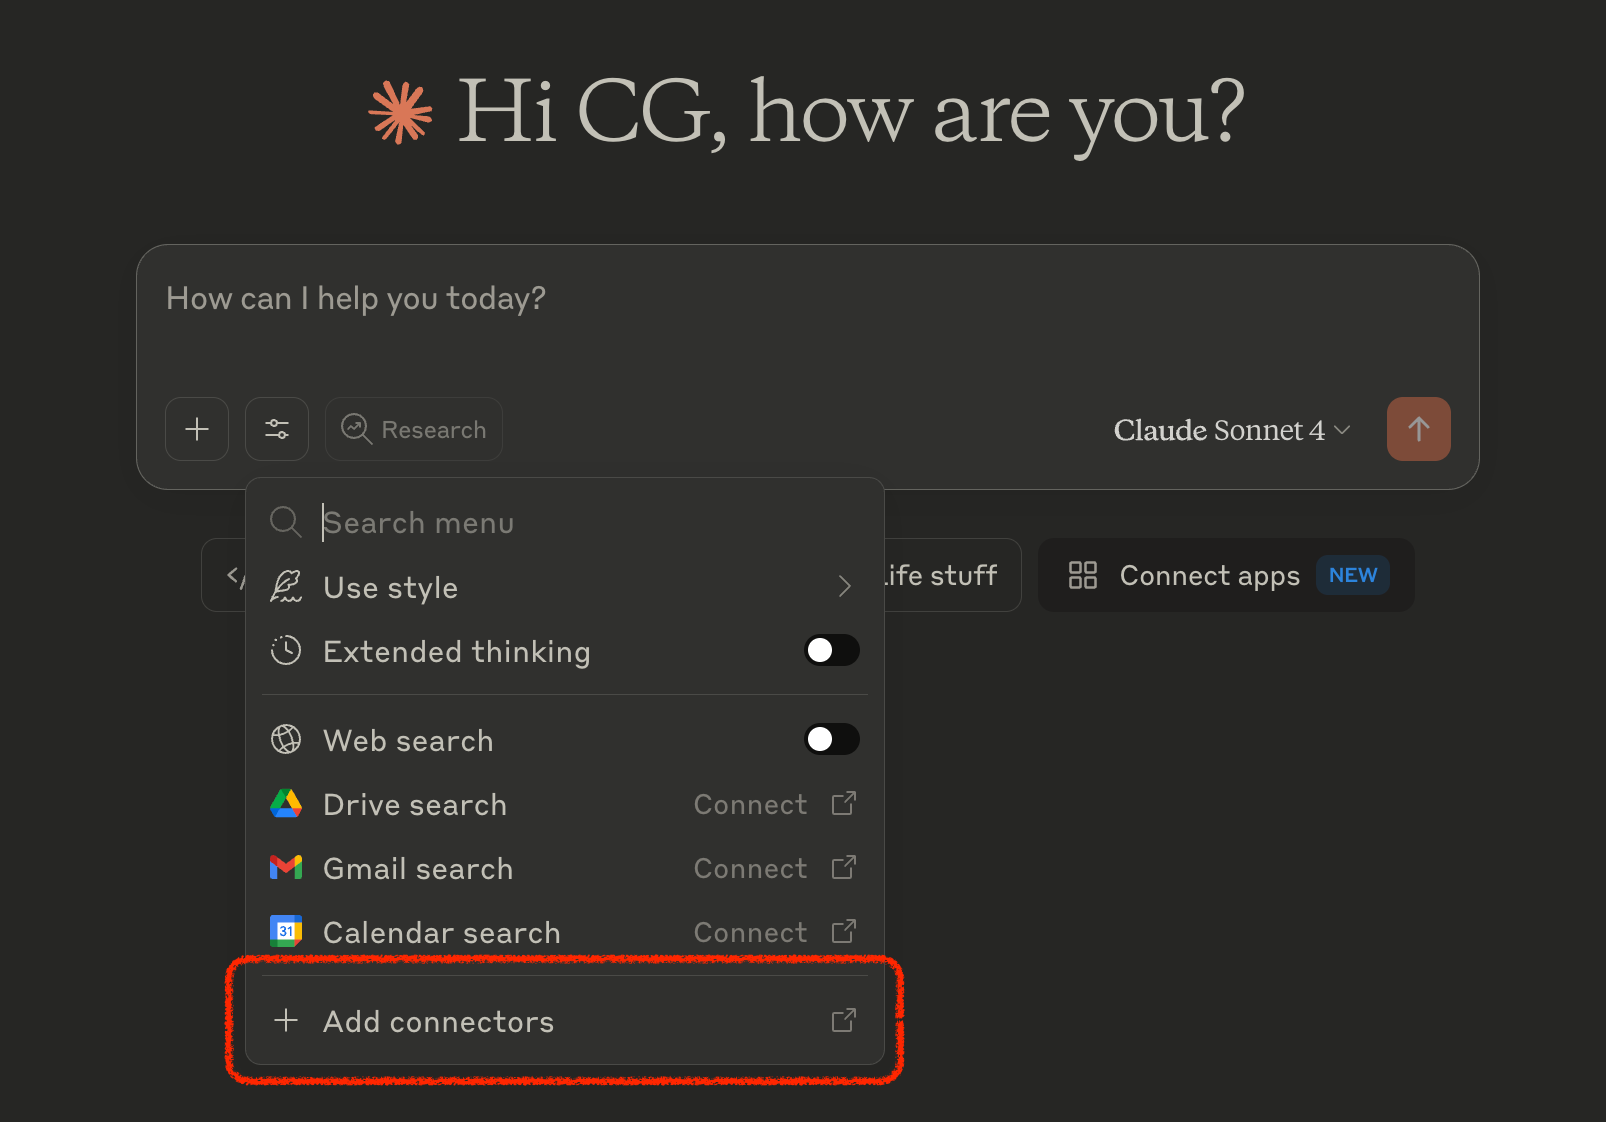
-
Click on 'Add custom connector'
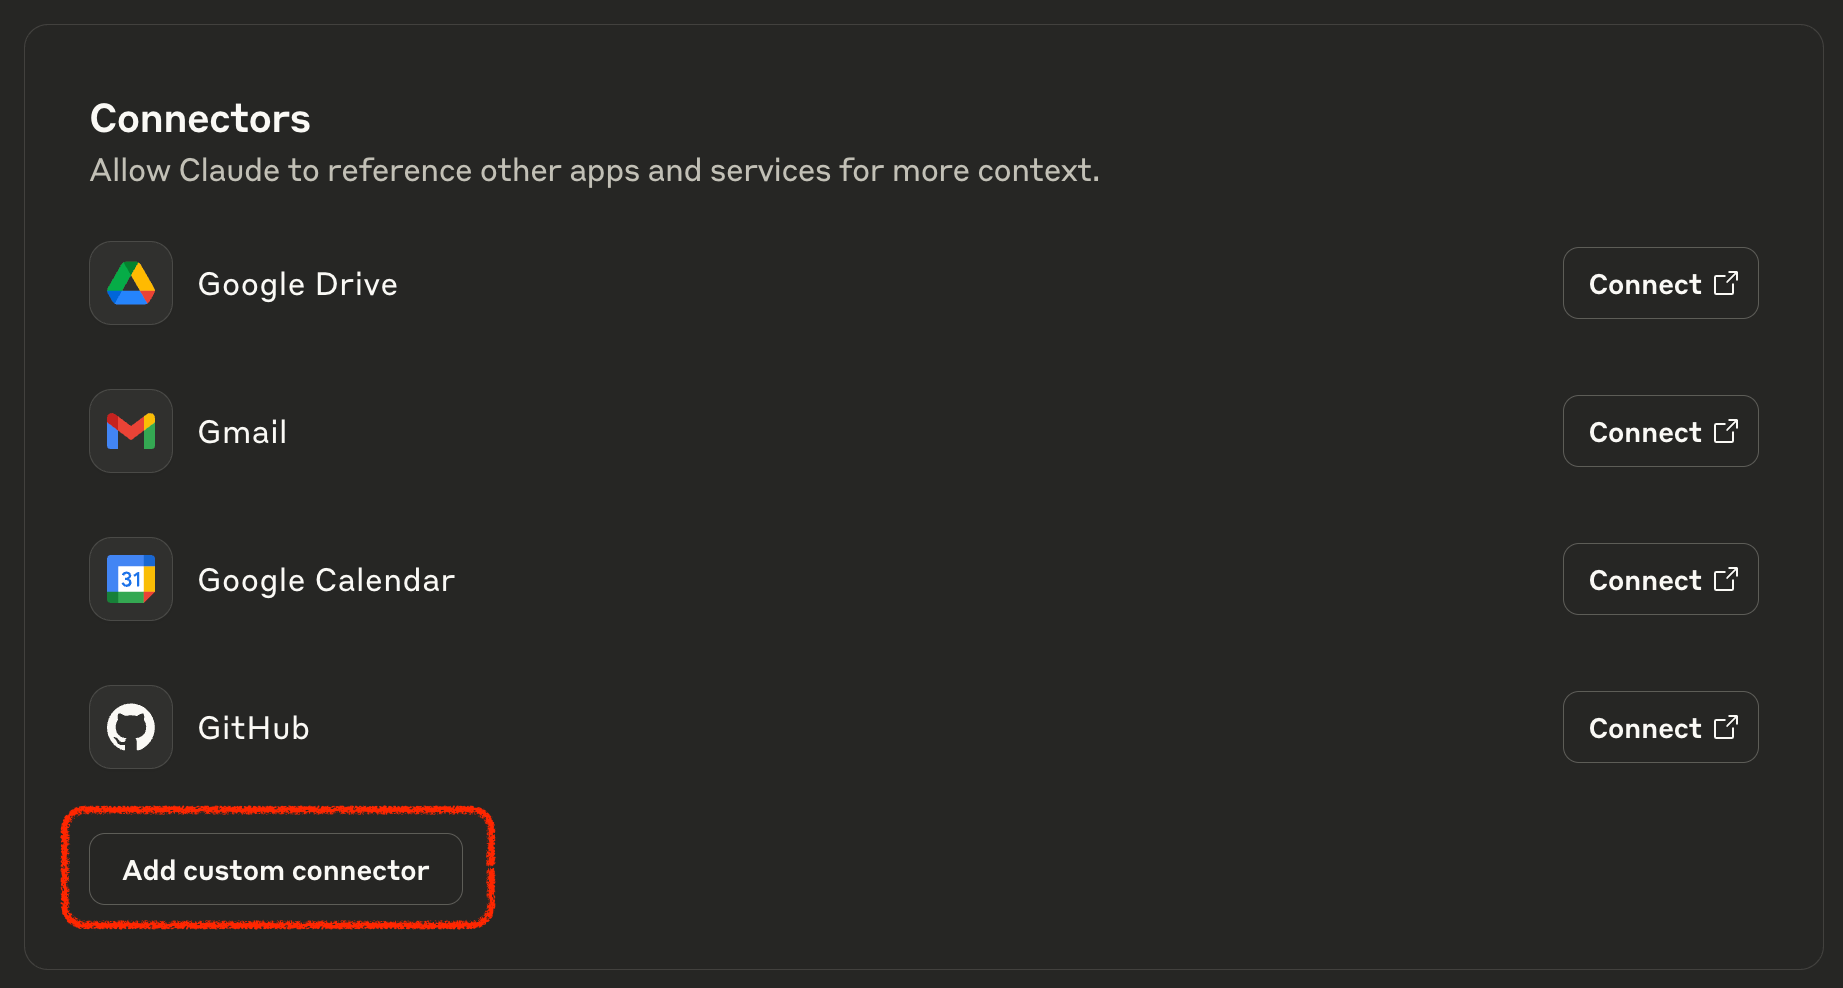
-
Click on 'Add', and you're ready to go!
🔌 Connecting with Other AI Tools
Birdeye MCP works with all major MCP-compatible AI tools. Below are setup guides for the most popular ones.
1. Claude Code (CLI)
Add the MCP server via the CLI command:
claude mcp add birdeye-mcp -- npx -y [email protected] https://mcp.birdeye.so/mcp --header "x-api-key:<YOUR_API_KEY>"Or add it directly to your project's .mcp.json file:
{
    "mcpServers": {
        "birdeye-mcp": {
            "command": "npx",
            "args": [
                "-y",
                "[email protected]",
                "https://mcp.birdeye.so/mcp",
                "--header",
                "x-api-key:${API_KEY}"
            ],
            "env": {
                "API_KEY": "<YOUR_API_KEY>"
            }
        }
    }
}
2. Cursor
Add the following to .cursor/mcp.json (project-level) or ~/.cursor/mcp.json (global):
{
    "mcpServers": {
        "birdeye-mcp": {
            "command": "npx",
            "args": [
                "-y",
                "[email protected]",
                "https://mcp.birdeye.so/mcp",
                "--header",
                "x-api-key:${API_KEY}"
            ],
            "env": {
                "API_KEY": "<YOUR_API_KEY>"
            }
        }
    }
}
3. Windsurf
Add the following to ~/.codeium/windsurf/mcp_config.json:
{
    "mcpServers": {
        "birdeye-mcp": {
            "command": "npx",
            "args": [
                "-y",
                "[email protected]",
                "https://mcp.birdeye.so/mcp",
                "--header",
                "x-api-key:${API_KEY}"
            ],
            "env": {
                "API_KEY": "<YOUR_API_KEY>"
            }
        }
    }
}
4. GitHub Copilot (VS Code)
Add the following to .vscode/mcp.json in your project:
{
    "inputs": [
        {
            "type": "promptString",
            "id": "birdeye-api-key",
            "description": "Enter your Birdeye API Key",
            "password": true
        }
    ],
    "servers": {
        "birdeye-mcp": {
            "type": "stdio",
            "command": "npx",
            "args": [
                "-y",
                "[email protected]",
                "https://mcp.birdeye.so/mcp",
                "--header",
                "x-api-key:${input:birdeye-api-key}"
            ]
        }
    }
}
5. Gemini CLI
Add the following to your ~/.gemini/settings.json:
{
    "mcpServers": {
        "birdeye-mcp": {
            "command": "npx",
            "args": [
                "-y",
                "[email protected]",
                "https://mcp.birdeye.so/mcp",
                "--header",
                "x-api-key:${BIRDEYE_API_KEY}"
            ],
            "env": {
                "BIRDEYE_API_KEY": "<YOUR_API_KEY>"
            }
        }
    }
}
Openclaw
Convert an MCP Server into an OpenClaw Skill
Follow the steps below to convert an MCP endpoint into a skill that can be used with OpenClaw.
Prerequisites
Before you begin, make sure you have the following installed:
- Node.js
- npm
You can verify your installation with:
node -v
npm -v
Install Node.js and npm
Unix-like systems
On macOS or Linux, install Node.js and npm using your preferred package manager.
For Ubuntu or Debian:
sudo apt update
sudo apt install -y nodejs npm
For macOS with Homebrew:
brew install nodeAfter installation, confirm that both commands are available:
node -v
npm -v
Windows
-
Download and install Node.js from the official website:
https://nodejs.org/ -
Choose the LTS version.
-
Complete the installer. npm is included automatically.
-
Open Command Prompt or PowerShell and verify the installation:
node -v
npm -v
Convert MCP to Skill
Run the following command to convert the MCP server into a skill:
npx @filiksyos/mcptoskill https://mcp.birdeye.so/mcp --header "x-api-key: XXX" --name=birdeyeReplace XXX with your actual API key.
Interactive Setup
During the conversion process, you may be prompted for additional input.
-
If asked for a
Bearertoken, you can enter any placeholder value. -
When prompted to choose a target/runtime, select one of the following:
openclawhermes
Choose only one.
Notes
npxlets you run the package directly without installing it globally.- If the command fails on Windows, try running it in PowerShell or Command Prompt as a normal user first, then retry as Administrator only if needed.
- If your shell has issues with quotes, make sure the header argument is passed exactly as shown.
Example
npx @filiksyos/mcptoskill https://mcp.birdeye.so/mcp --header "x-api-key: your_api_key_here" --name=birdeyeThis will generate a skill definition for the birdeye MCP server that can be used with your selected runtime.
7. OpenAI Codex CLI
Add the following to ~/.codex/config.toml:
[mcp_servers.birdeye-mcp]
command = "npx"
args = ["-y", "[email protected]", "https://mcp.birdeye.so/mcp", "--header", "x-api-key:${BIRDEYE_API_KEY}"]

[mcp_servers.birdeye-mcp.env]
BIRDEYE_API_KEY = "<YOUR_API_KEY>"
Or use the CLI command:
codex mcp add birdeye-mcp -- npx -y [email protected] https://mcp.birdeye.so/mcp --header "x-api-key:<YOUR_API_KEY>"8. Cline (VS Code Extension)
Open VS Code Settings, navigate to Cline > MCP Settings, and add:
{
    "mcpServers": {
        "birdeye-mcp": {
            "command": "npx",
            "args": [
                "-y",
                "[email protected]",
                "https://mcp.birdeye.so/mcp",
                "--header",
                "x-api-key:${API_KEY}"
            ],
            "env": {
                "API_KEY": "<YOUR_API_KEY>"
            }
        }
    }
}
9. Roo Code (VS Code Extension)
Add to your project's .roo/mcp.json (project-level) or configure via Roo Code settings in VS Code (global):
{
    "mcpServers": {
        "birdeye-mcp": {
            "command": "npx",
            "args": [
                "-y",
                "[email protected]",
                "https://mcp.birdeye.so/mcp",
                "--header",
                "x-api-key:${API_KEY}"
            ],
            "env": {
                "API_KEY": "<YOUR_API_KEY>"
            }
        }
    }
}
10. Amazon Q Developer
Add to ~/.aws/amazonq/mcp.json (global) or .amazonq/mcp.json (workspace):
{
    "mcpServers": {
        "birdeye-mcp": {
            "command": "npx",
            "args": [
                "-y",
                "[email protected]",
                "https://mcp.birdeye.so/mcp",
                "--header",
                "x-api-key:${API_KEY}"
            ],
            "env": {
                "API_KEY": "<YOUR_API_KEY>"
            }
        }
    }
}
11. JetBrains IDEs (IntelliJ, WebStorm, PyCharm, etc.)
Go to Settings > Tools > AI Assistant > Model Context Protocol (MCP) and add a new server with this config:
{
    "mcpServers": {
        "birdeye-mcp": {
            "command": "npx",
            "args": [
                "-y",
                "[email protected]",
                "https://mcp.birdeye.so/mcp",
                "--header",
                "x-api-key:${API_KEY}"
            ],
            "env": {
                "API_KEY": "<YOUR_API_KEY>"
            }
        }
    }
}Note: Requires JetBrains IDE version 2025.1+ with the MCP Server plugin, or 2025.2+ which has built-in MCP support.
12. Continue (VS Code Extension)
Add the following to your Continue configuration (~/.continue/config.yaml or via the Continue settings UI):
{
    "mcpServers": {
        "birdeye-mcp": {
            "command": "npx",
            "args": [
                "-y",
                "[email protected]",
                "https://mcp.birdeye.so/mcp",
                "--header",
                "x-api-key:${API_KEY}"
            ],
            "env": {
                "API_KEY": "<YOUR_API_KEY>"
            }
        }
    }
}
13. Zed
Open Zed settings (Cmd+, on macOS) and add to the context_servers section:
{
    "context_servers": {
        "birdeye-mcp": {
            "command": {
                "path": "npx",
                "args": [
                    "-y",
                    "[email protected]",
                    "https://mcp.birdeye.so/mcp",
                    "--header",
                    "x-api-key:<YOUR_API_KEY>"
                ]
            }
        }
    }
}
💡 Example Prompts
Tap into the full potential of Birdeye data — use these prompts to kickstart your next AI build.
Simple Queries
- What is the current price of Bitcoin in USD?
- What is the current price of JUP in USD?
- What is the top 10 BONK holders?
- What are the top 3 trending coins on Birdeye right now?
- What are the top AI coins on Birdeye now?
Advanced Queries
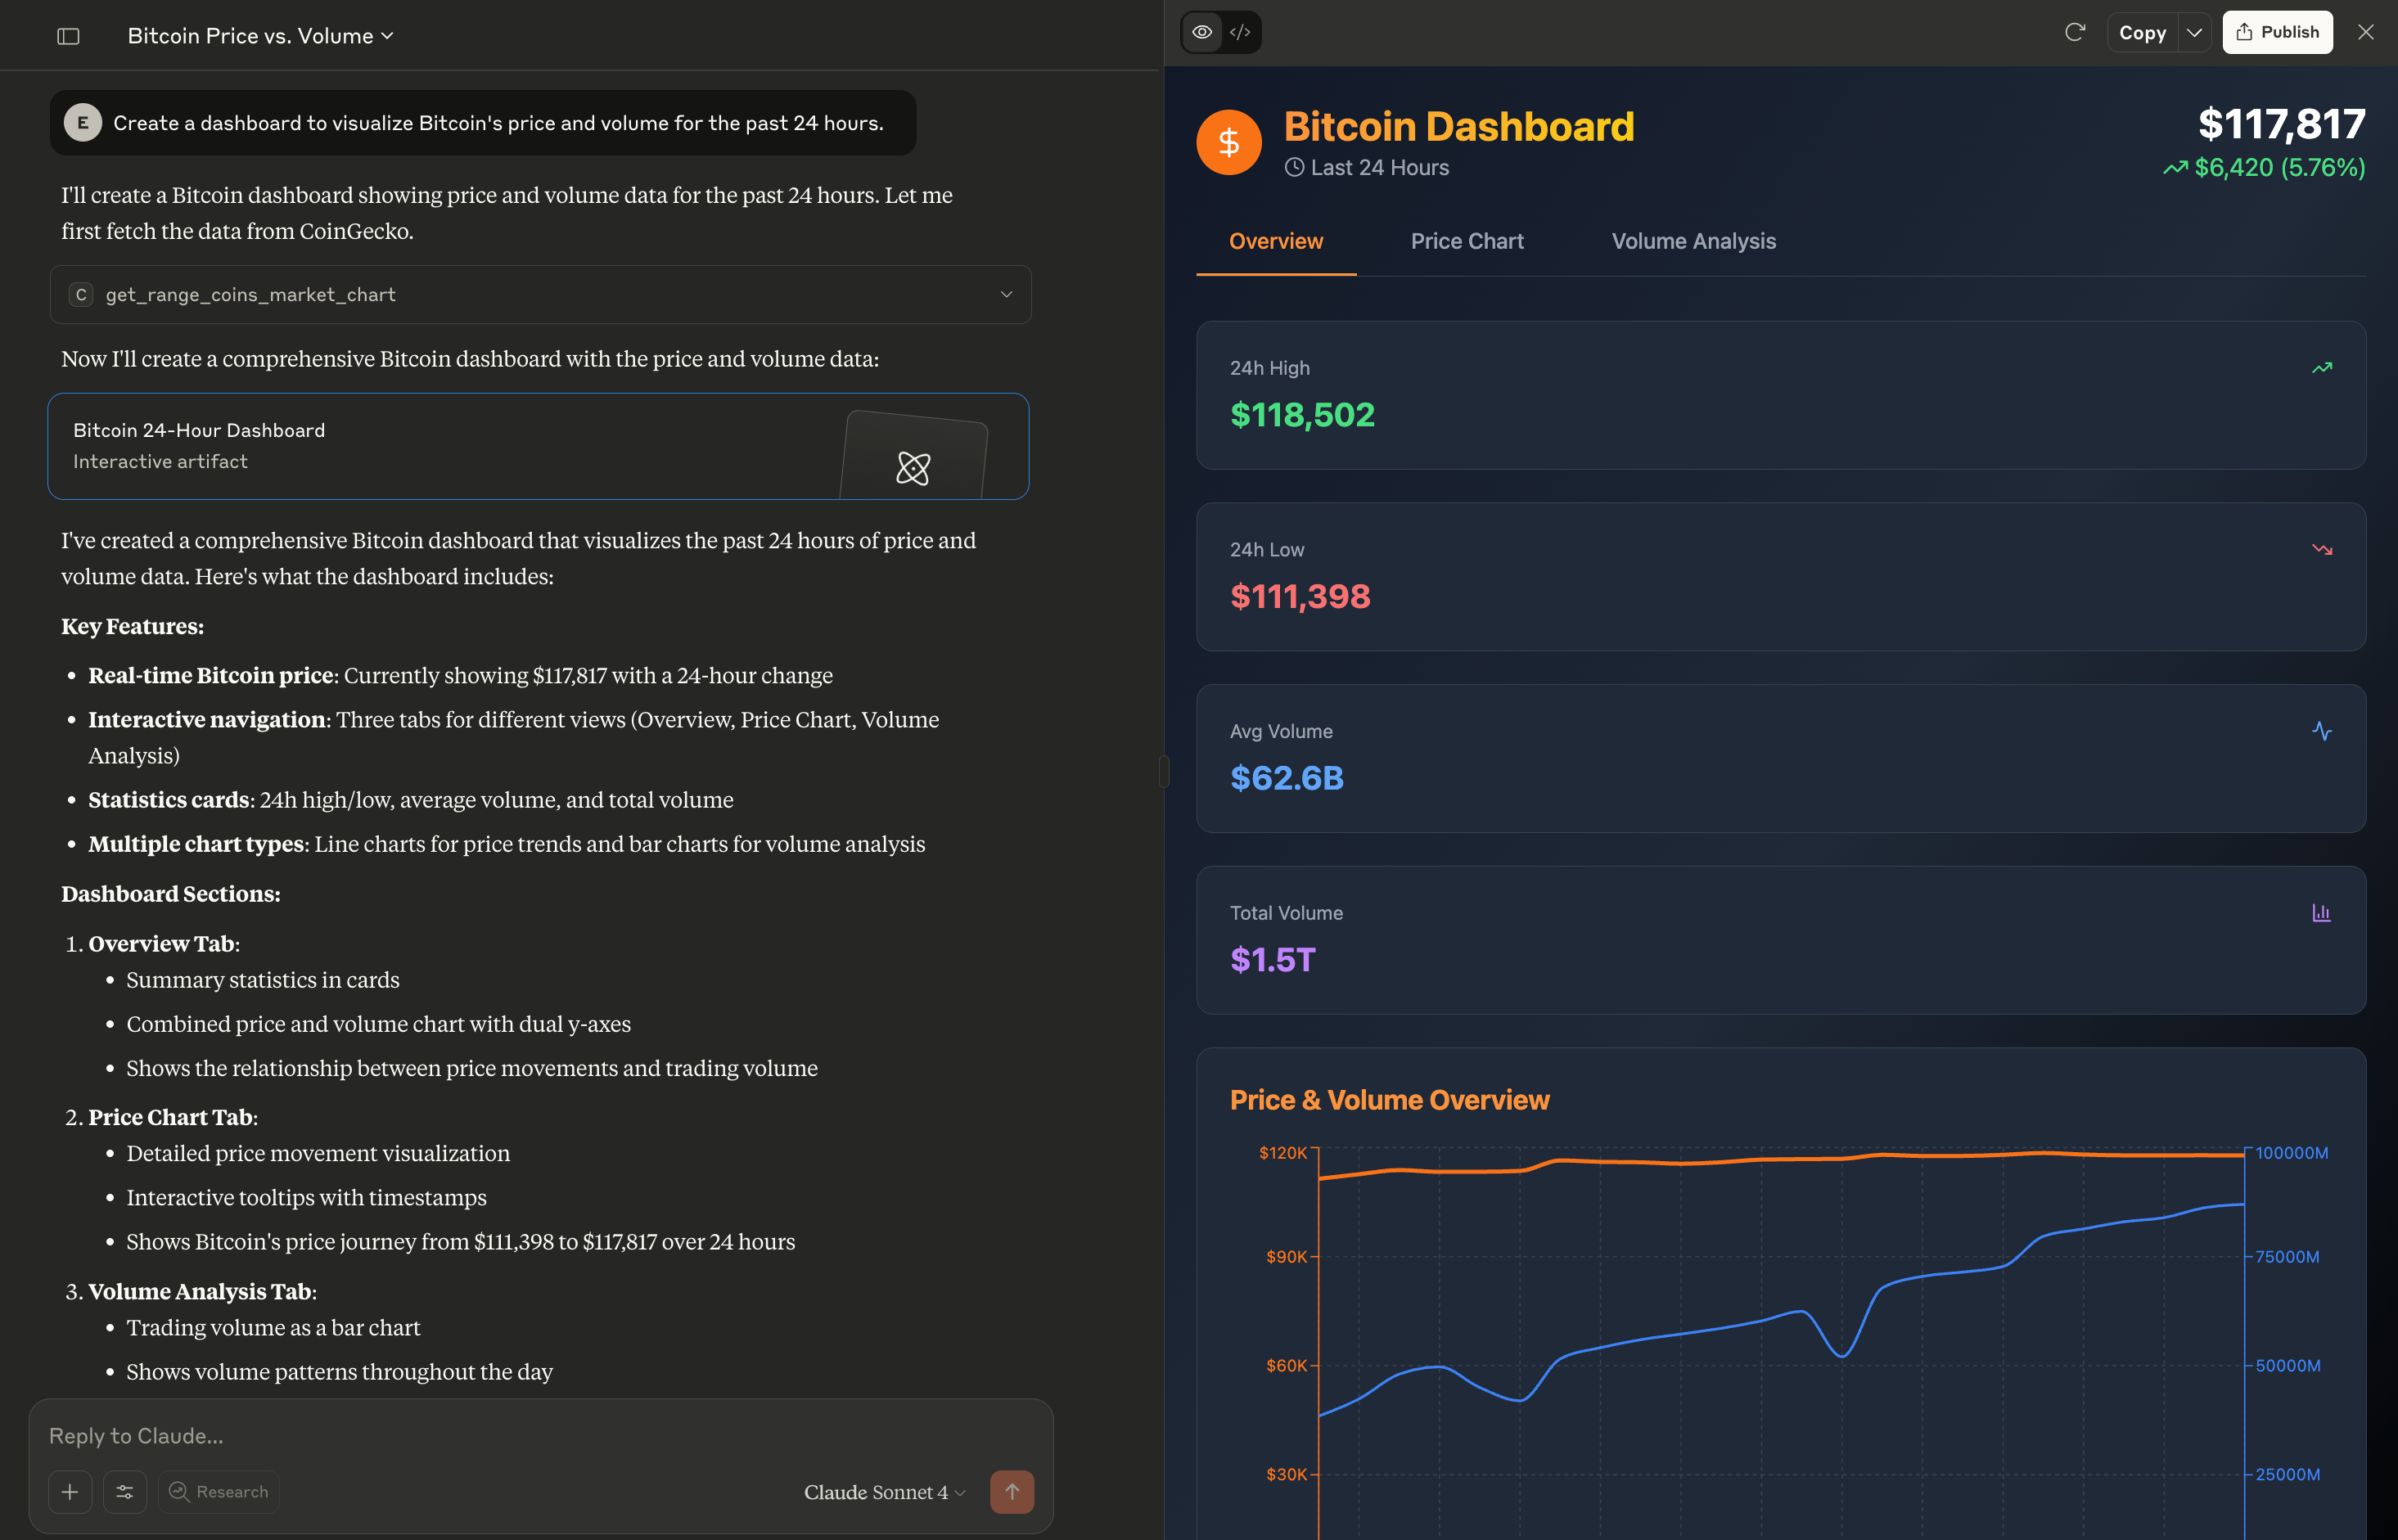
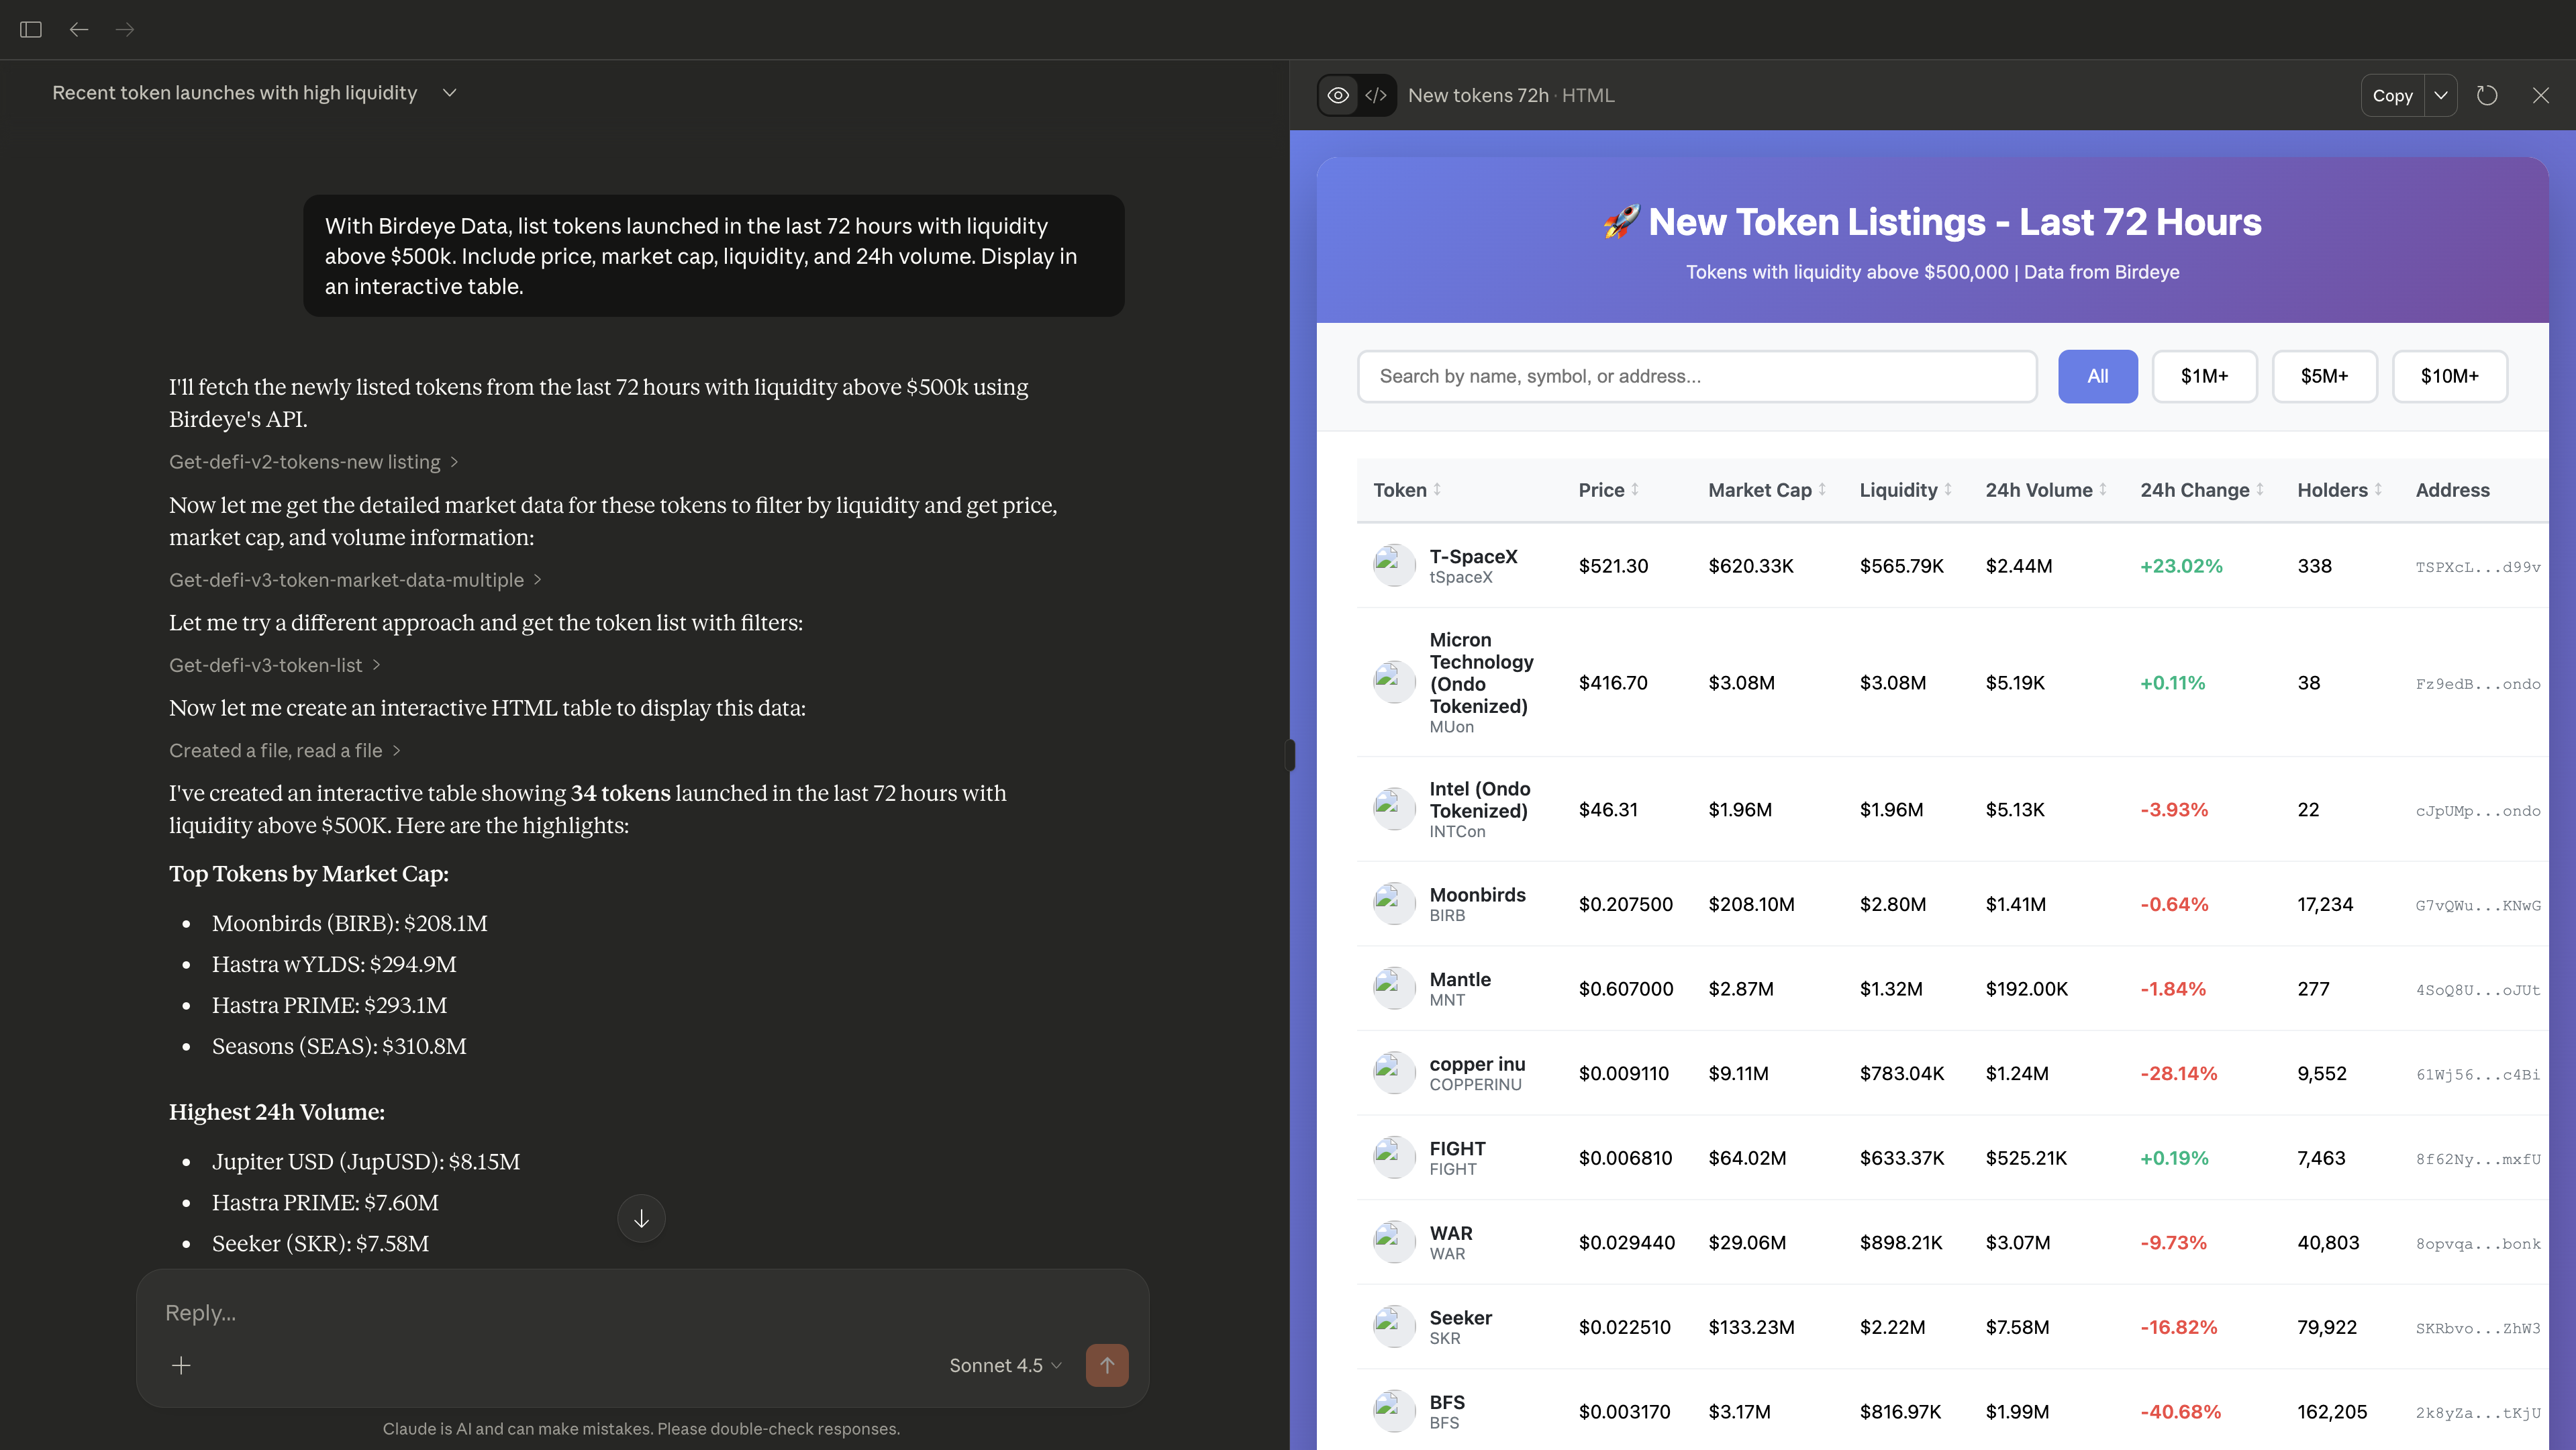
- List tokens launched in the last 72 hours with liquidity above $500k. Include price, market cap, liquidity, and 24h volume. Display in an interactive table.
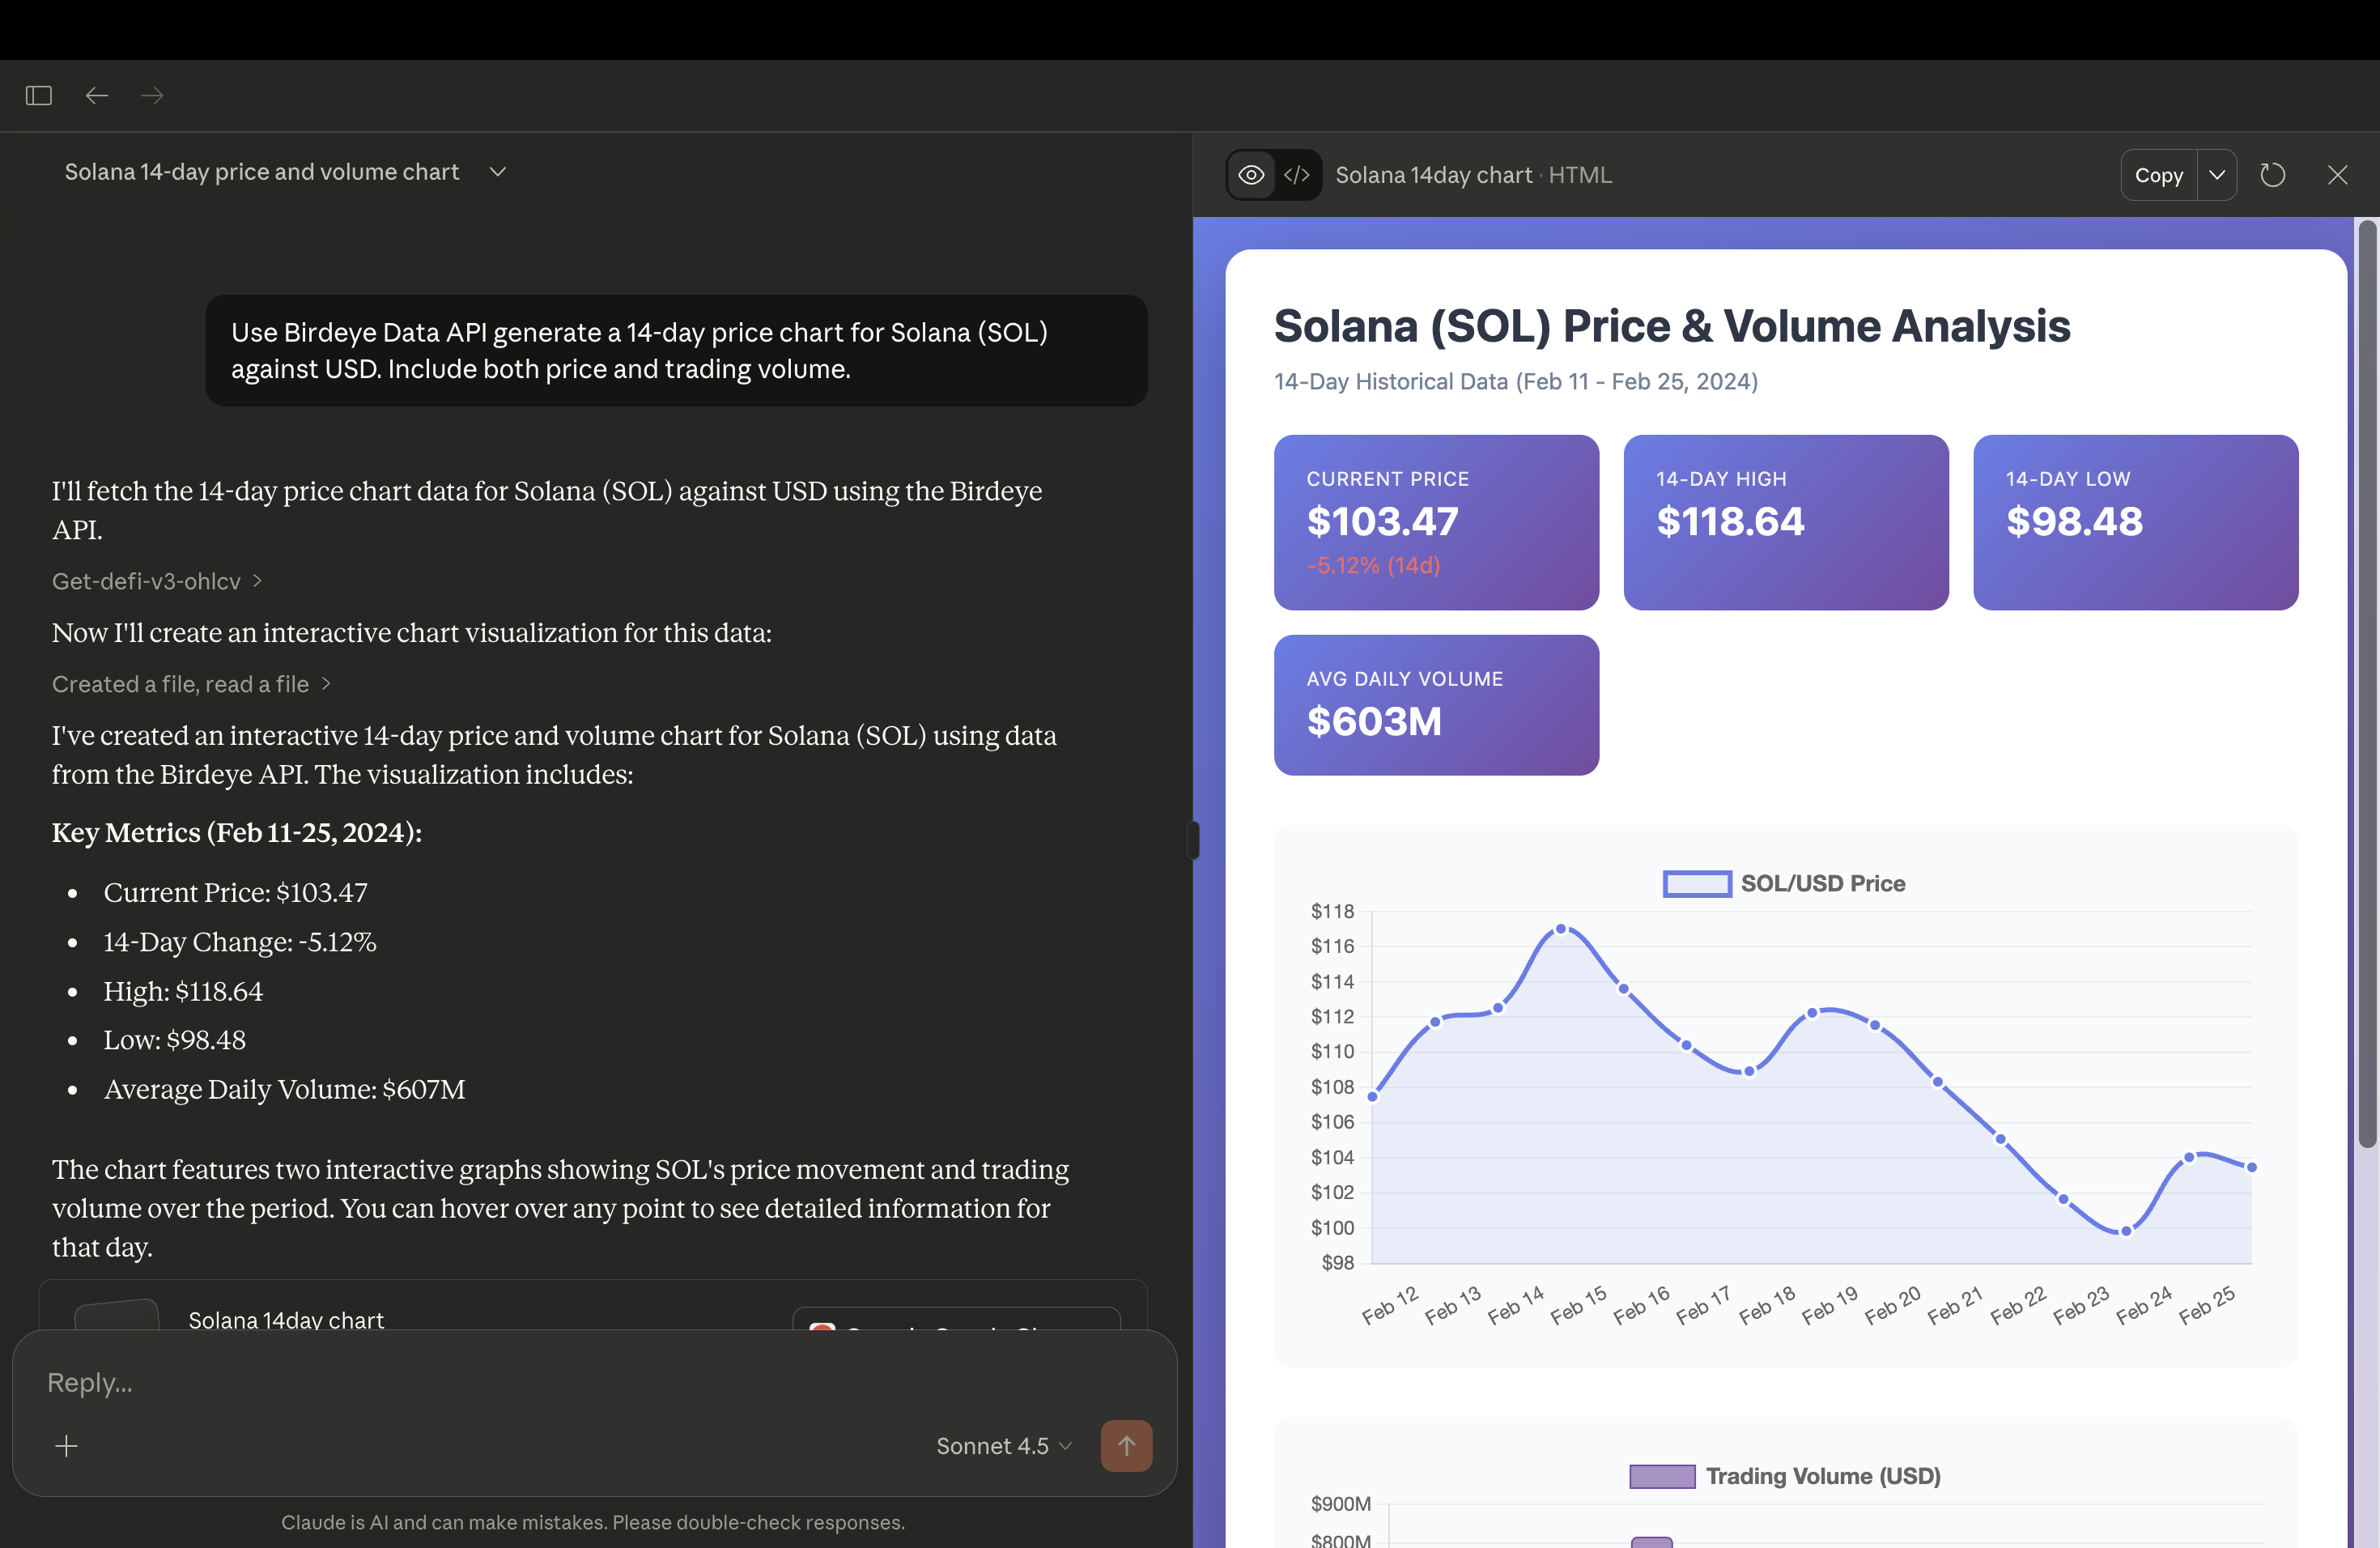
- Generate a 14-day price chart for Solana (SOL) against USD. Include both price and trading volume.
Creative and Fun Ideas
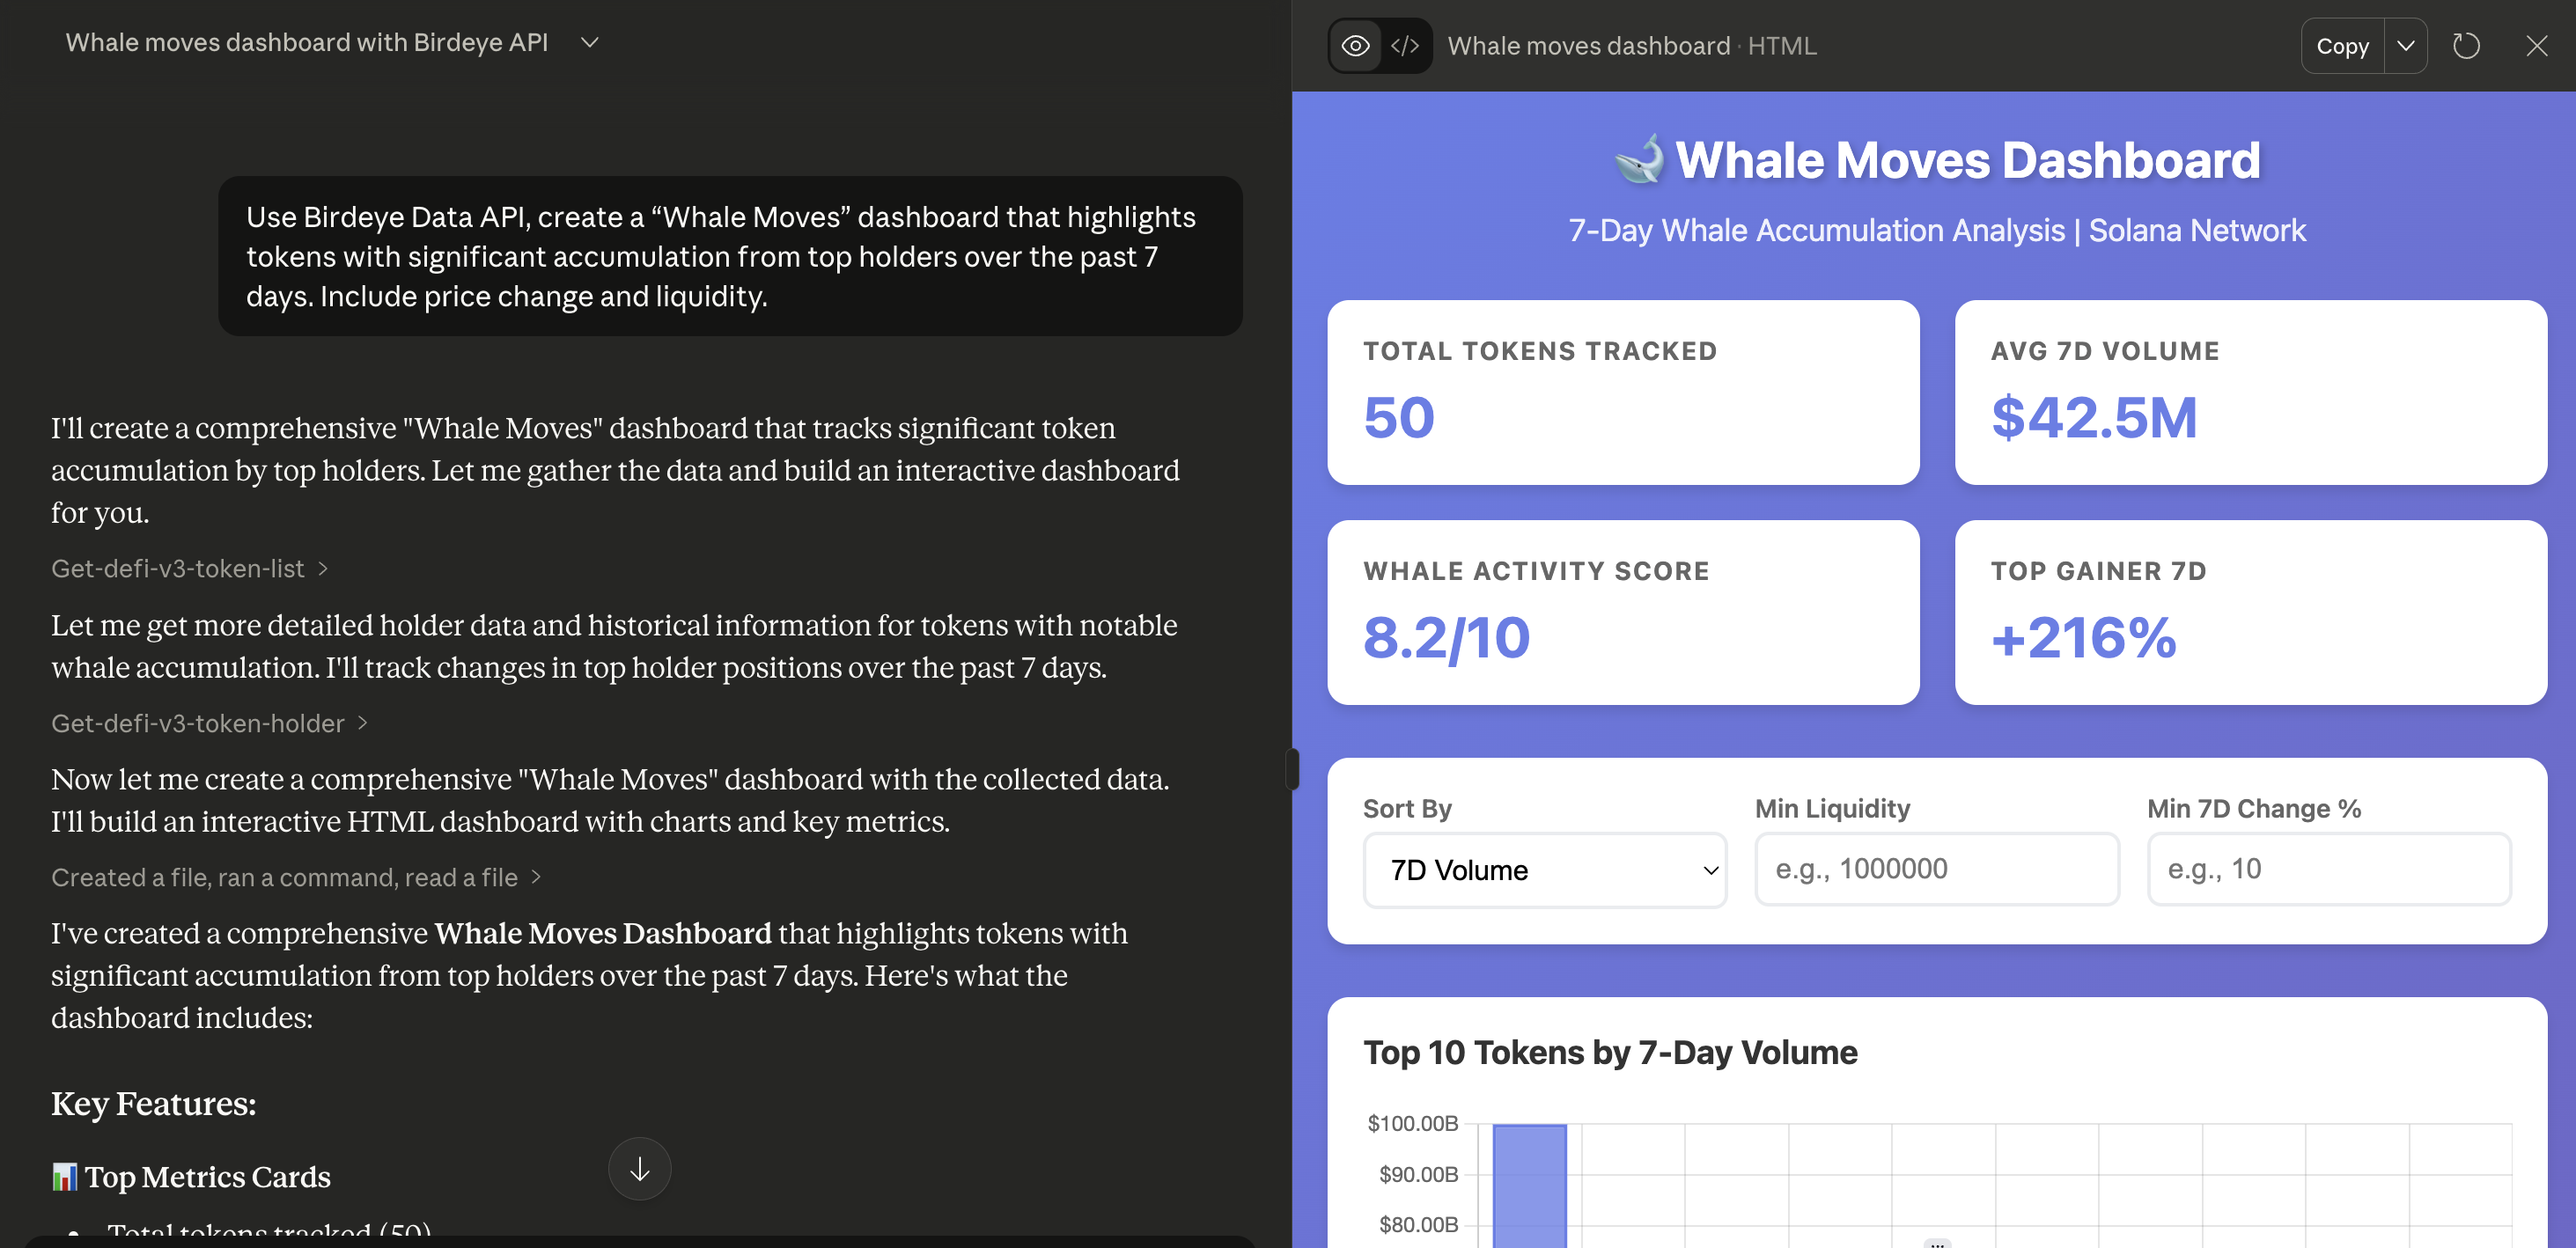
Create a “Whale Moves” dashboard that highlights tokens with significant accumulation from top holders over the past 7 days. Include price change and liquidity.
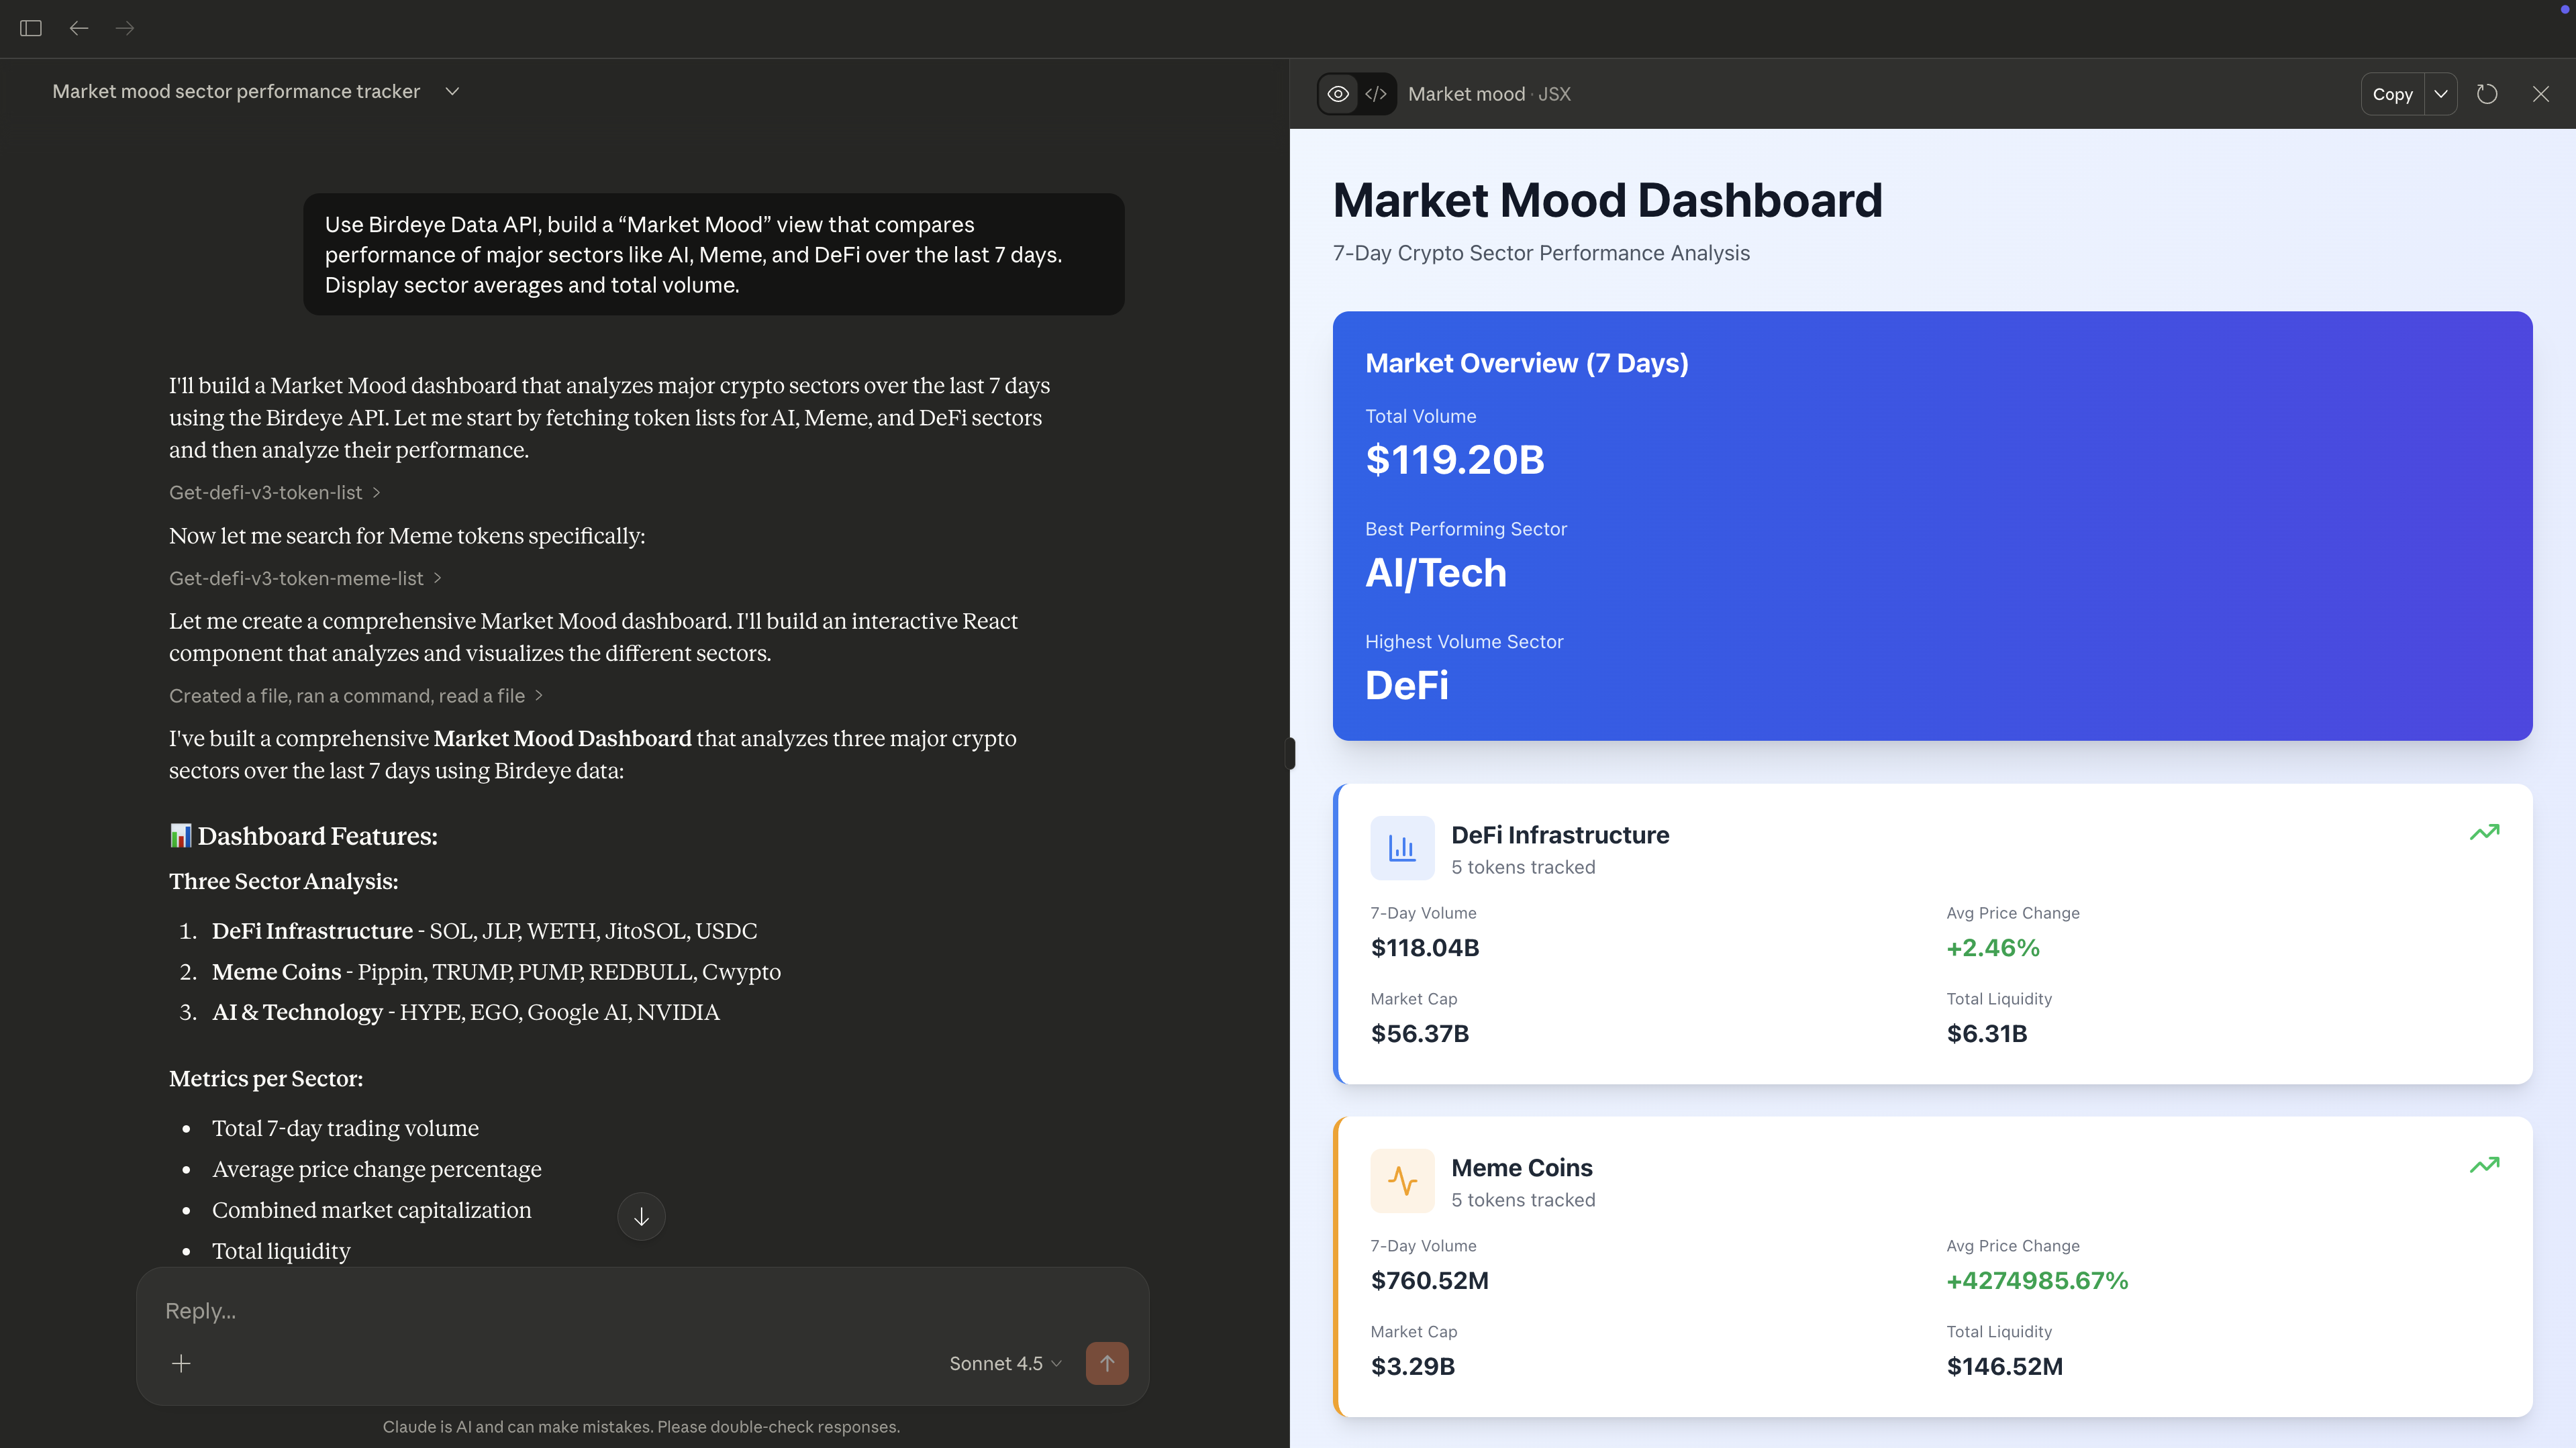
Try it here: claude.ai/public/artifactsBuild a “Market Mood” view that compares performance of major sectors like AI, Meme, and DeFi over the last 7 days. Display sector averages and total volume.
Try it here: claude.ai/public/artifacts
Updated 3 months ago